


Deutsche Version
Deutsche Version
![]() -
-
![]() English version
English version
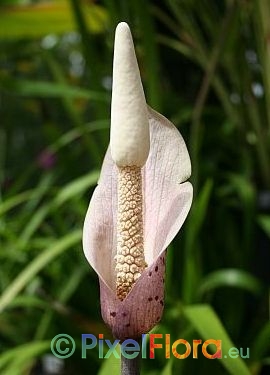
The Genus Amorphophallus
(Titan Arums)
| Origin, Habit and General Information | |
|
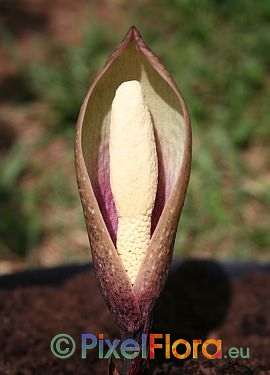
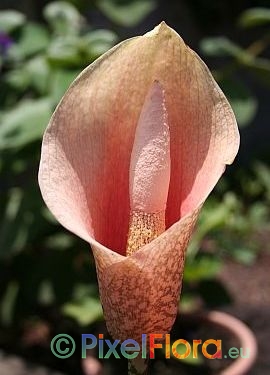
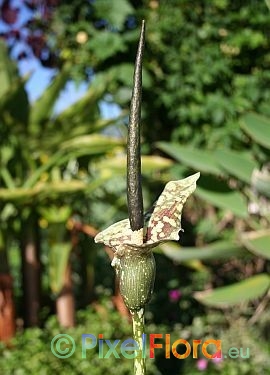
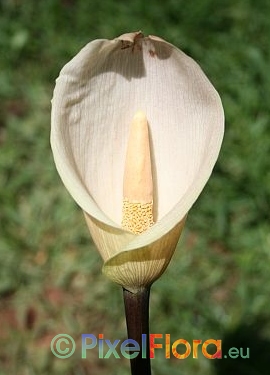
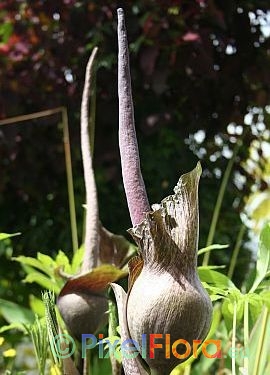
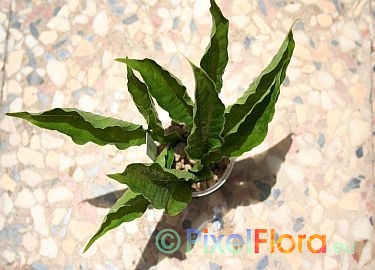
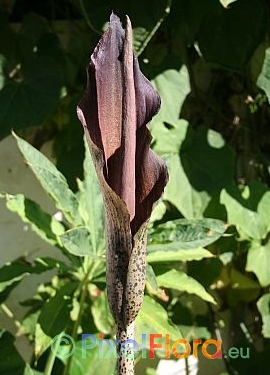
The genus Amorphophallus
is well known for the famous Amorphophallus titanum, commonly known as "Titan
Arum". The Titan Arum holds the plant world record for an unbranched single inflorescence. The inflorescence eventually may reach
up to three meters and more in height. Besides this
outstanding species more than 230 Amorphophallus species have been described -
and each year some more new findings are published. A more or less complete list of all validly
described Amorphophallus species and many photos are available from the website of the
International Aroid Society. (
www.aroid.org ).
If you are interested in this fascinating genus, think about becoming a member
of the International Aroid Society! The International Aroid Society is the worldwide
leading society in aroids and offers a membership at a very low price and with
many benefits! The majority of Amorphophallus species is
native to subtropical and tropical lowlands of forest margins and open, disturbed spots
in woods throughout Asia. Few species are found in Africa (e.g. Amorphophallus abyssinicus,
from West to East Africa), Australia (represented by a single species only, namely Amorphophallus galbra,
occuring in Queensland, North Australia and Papua New Guinea), and Polynesia respectively. Few species, such as Amorphophallus paeoniifolius (Madagascar to Polynesia), serve as a food source throughout the Asian region. |
      |
|
Cultivation |
|
|
In cultivation, most species are easily grown in any humus-rich, organic, very well drained and well aerated soil. The majority of Amorphophallus species can be grown at some 20°C (optimal 25°C) during summer in a semi-moist soil in a partially shaded spot with protection from direct sunlight, especially during hours at midday. Few tropical species, such as the famous Amorphophallus titanum from Sumatra, require an overall higher average temperature of some 25°C throughout their entire growing cycle and during dormancy as well. Few species (mostly the beforehand mentioned tropical species) have a prolonged growing cycle which exceeds 12 months, or they may be even evergreen (e.g. Amorphophallus coaetaneus). However most species will follow seasons and their single leaf will yellow from late summer to early winter . At this point, plants should be kept drier at a minimum of some 15°C. Tropical species require a higher temperature and very careful watering during dormancy. It is not essential, that dormant tubers are kept completely dry, but soil should not be soaked wet at any time during dormancy. As a matter of fact, a dry storage will inevitably lead to losses in most tropical species. However, most African species from seasonally dry areas (e.g. Amorphophallus andranogydroensis, Amorphophallus consimilis, and Amorphophallus dracontioides) are best kept completely dry during dormancy.
Formerly, Amorphophallus species had been
separated into two distinct cultivation groups with different cultivation
requirements concerning soil composition, minimum temperatures and water suppply
during dormancy. On grounds of some more recent and more detailed cultivation
experiences, most species can be successfully grown in one and the same soil
mixture (see above). Different temperatures are not necessary during dormancy
either. However, several highland species will come into growth earlier,
probably in mid winter already, and hence they will require artificial light. It
is not necessary either to keep soil completely dry during dormancy. Several
species will show less vigor and minor growth, if the tuber is kept completey
dry during dormancy. In most species, a slightly moist soil will be suitable (with
exception for a couple of more delicate African species). As a general rule: the
moister the soil, the higher temperatures have to be during dormancy. Tropical
species require a temperature optimum of not below 25°C throughout the year,
whereas some 15°C to 20°C are sufficient for all other species. |
  |
| Propagation by Seeds | |
|
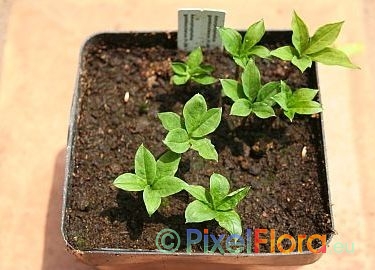
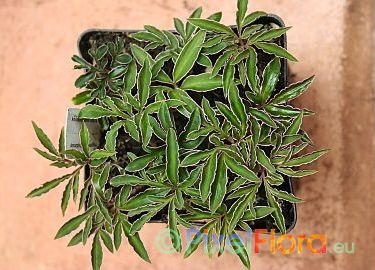
Most Amorphophallus are extremely easily raised from preferably fresh seeds. If seeds cannot be sowed immediately, they may be stored for some weeks or months. Seeds from Amorphophallus kiusianus and Amorphophallus konjac showed still good germination rates after more than 12 months storage at 7°C in semi-moist peat moss. However it is essential that seeds are constantly kept slightly moist (e.g. in slightly moist peat moss) and at lower temperatures of some 10°C in order to delay the germination process. Once completely desiccated or frozen, Amorphophallus seeds will have lost their viability and they will not germinate anymore. Prior to sowing the outer flesh has to be removed by thoroughly rinsing it away with water. Wear some protective hand gloves, for the flesh contains some very irritant substances. The flesh also contains some chemical which act as germination inhibitors. These susbtances will siginificantly delay germination, if the entire berry is sowed. Seeds are potted some 1 cm deep in the same soil mix as one would use for ault tubers. Soil should be kept slightly moist at all times. The optimal temperature is some 25°C at day and some 20°C at night. One should add a couple of degrees for all tropical species. Most seedlings will occur within some 2 to 6 weeks (examples from the left: 6 weeks old Amorphophallus gomboczianus seedlings and 6 months old Amorphophallus laoticus seedlings). Some may take a couple of weeks more. Seeds of Amorphophallus kiusianus may well need some 6 months and more to germinate. Most seedlings show a prolonged growing cycle in comparison to older and mature specimens within the same species. Thus pots should kept warm in partial shade throughout the year as long as seedlings are “in green”, i.e. as long as they have a leaf. Several seedlings may make not only one, but two or more subsequent leaves before they enter dormancy for the first time. As a general rule, young dormant seedling tubers, as well as any other small offset tubers or leaf bulbils, shall not be kept completely dry during dormancy, as they may desiccate more easily. |
  |
| Propagation by Offsets & Leaf Bulbils | |
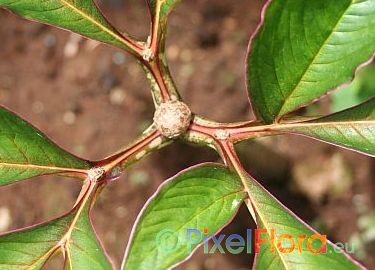
| Apart from seeds, most species vegetatively propagate as well. They either propagate by stoloniferous offsets (e.g. Amorphophallus albus, Amorphophallus antsingyensis, Amorphophallus bangkokensis, Amorphophallus impressus, Amorphophallus krausei, and Amorphophallus konjac), by small adjacent tubers (e.g. Amorphophallus thaiensis, Amorphophallus odoratus, Amorphophallus paeoniifolius, and Amorphophallus yunnanensis) or rarely by leaf bulbils (e.g. Amorphophallus beccarii, Amorphophallus bufo, Amorphophallus bulbifer [see foto with large central leaf bulbil and three developping adjecent bulbils], Amorphophallus muelleri, Amorphophallus yuloensis, and Amorphophallus xiei). These offsets and small tubers shall stay attached to the main tuber until they can be separated easily. Leaf bulbils can be easily separated from the leaf after the leaf will have withered. |
 |
| Propagation by Leaf Cuttings |
|
Leaf
cuttings and in-vitro cultivation
are some more dedicated advanced methods of vegetative propagation.
Whereas in-vitro propagation requires some rather expensive material and special
techniques and experience, it is quite easy and rather inexpensive
to take leaf cuttings, even for not that experienced private cultivators. It has
to be noted, that not all species can be successfully propagated from leaf
cuttings. For example, so far this method has failed in Amorphophallus konjac
and in Amorphophallus paeoniifolius. And in those species, which can
be grown from leaf cuttings, not all cuttings will eventually make a tuber. But
for the rarer species it is quite worth the effort, especially for those, which
do not make any offsets or leaf bulbils (e.g. Amorphophallus borneensis,
Amorphophallus
decus-silvae, Amorphophallus
gigas , and Amorphophallus
titanum ). From the latter four
species, Amorphophallus titanum is easily propagated via leaf cuttings,
provided that leaflets are mature and of an adequate size. |
 The
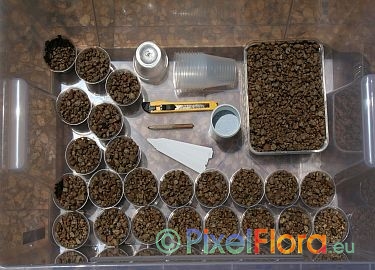
following material will be necessary to take leaf cuttings: The
following material will be necessary to take leaf cuttings:- a transparent plastic box with cover, large enough to host the cuttings - small pots with a bottom hole, preferably transparent to easily control root growth - a sharp and clean knife and some alcohol solution for desinfection - some lables and a pencil - preferably some rooting hormone, especially formulated for leaf cuttings - finely granulated, clean washed pumice or any other inorganic small grained substrate |
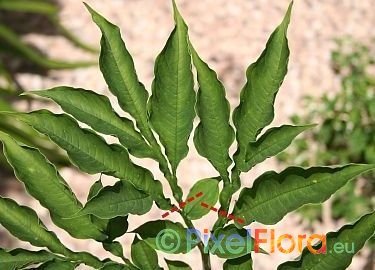 A
healthy leaf shall be chosen for taking cuttings. And the cutting should
be preferably made in the early morning hours, as long as the leaf is
turgescent. The cut should be directly made above a branching point (see dotted red line). A
healthy leaf shall be chosen for taking cuttings. And the cutting should
be preferably made in the early morning hours, as long as the leaf is
turgescent. The cut should be directly made above a branching point (see dotted red line).
Under optimal conditions, the leaf is some 1 to 3 months old. Younger leaves may be too immature, whereas older leaves may be programmed to enter dormancy already. As an exception to the above rules, leaf cuttings can be taken at any time in a rescue try for a rare species with signs of a rotting tuber. It may prove easier to rescue a species by taking leaf cuttings instead of trying to rescue the infested tuber. |
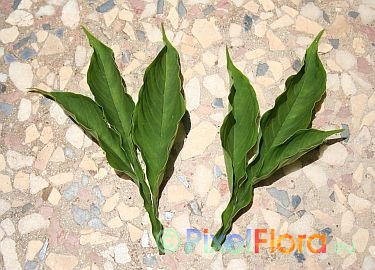 A
typical cutting is some 10cm to 20cm (or more) long, depending on species and its size of
leaflets. The cutting consists of at least one to three
leaflets, maybe even some more in very small species to have a
sufficiently large surface for photosynthesis. A
typical cutting is some 10cm to 20cm (or more) long, depending on species and its size of
leaflets. The cutting consists of at least one to three
leaflets, maybe even some more in very small species to have a
sufficiently large surface for photosynthesis.
|
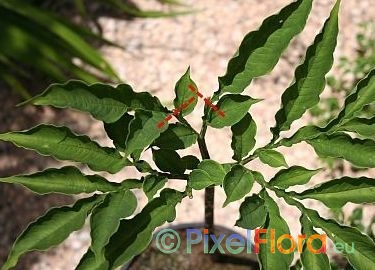 The
cut should be made straight with a very sharp knife and without squeezing
the
tissue. The
cut should be made straight with a very sharp knife and without squeezing
the
tissue.As a general rule, from well grown plants 1/3 of a leaf can be taken. This way, the mother plant has a still sufficiently large leaf surface for photosynthesis and to increase its own tuber in size or to maintain its size. In very large mature specimens up to 1/2 of the leaf may be taken for leaf cuttings. In the left example of Amorphophallus macrorhizus, some 1/4 was taken from the total leaf surface. |
 In
between cuttings, the knife blade should be desinfected, e.g. by dipping it
into an alcohol solution. Let the knife blade dry up before taking the next cutting. In
between cuttings, the knife blade should be desinfected, e.g. by dipping it
into an alcohol solution. Let the knife blade dry up before taking the next cutting.Preferably use a rooting hormone as directed on the package. Some species may be successfully propagated without using any rooting hormone. However, in general the success rate will be much lower and it may take longer for the cutting to make a new basal tuber. Do not forget to write a label for each pot in order to not get lost with identifications later, especially if cuttings from more than one species are going to be taken! |
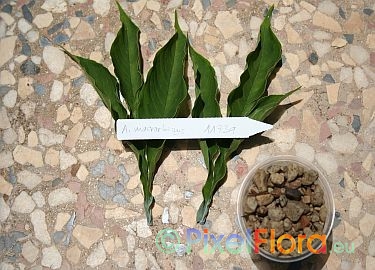
 After
taking the cutting, immediately dip it into the powder, shake off any
excessive powder and plant the leaf cut vertically into a small pot.
Depending on pot size, one or more cuttings will fit into a single pot (in
the left example, two cuttings were planted). Pumice or any other
inorganic substrate will work best. Organic substrates (such as peat based
soils and the like) are less recommended, for these will usually promote
bacterial and fungal growth. After
taking the cutting, immediately dip it into the powder, shake off any
excessive powder and plant the leaf cut vertically into a small pot.
Depending on pot size, one or more cuttings will fit into a single pot (in
the left example, two cuttings were planted). Pumice or any other
inorganic substrate will work best. Organic substrates (such as peat based
soils and the like) are less recommended, for these will usually promote
bacterial and fungal growth.
|
 Carefully
place the small pot in a transparent plastic box and put on the cover to
raise air humidity. The box should be large and tall enough, so that the
leaflet tip will not touch the cover (possible rotting!). Store the
plastic box in a shaded place with some indirect sunlight at some 25°C to
30°C. Control humidity every other day and if necessary, mist the cuttings. Carefully
place the small pot in a transparent plastic box and put on the cover to
raise air humidity. The box should be large and tall enough, so that the
leaflet tip will not touch the cover (possible rotting!). Store the
plastic box in a shaded place with some indirect sunlight at some 25°C to
30°C. Control humidity every other day and if necessary, mist the cuttings.Cuttings will start to produce some callus tissue after some 4 to 12 weeks and a couple of weeks later some roots will form. A first small new leaf will eventually appear from the base of the cutting and/or the cutting will make a small dormant tuber before it will wither. If the leaf cutting withers and no new leaf has been created, carefully check its base. In most cases it will have made a small dormant tuber. Cultivation for these newly formed tubers is the same as mentioned above for growing seedlings. |
| Pests and Diseases |
   In general, Amorphophallus species are rather
trouble-free and easy-going in cultivation, provided that some basic cultivation
guidelines are complied. In general, Amorphophallus species are rather
trouble-free and easy-going in cultivation, provided that some basic cultivation
guidelines are complied.However, dormant tubers are sometimes prone to fungal or bacterial infections and rotting, especially in very moist soils and at rather low temperatures at the same time. If an infection is detected (parts of the tuber start to get slimy or mashy), an effort of rescue may be started by generously cutting away all infected parts. The rest of the tuber shall hence be dusted with some power fungicide and kept absolutely dry for several days before being repotted in a rather dry soil. In general and as a prevention measure against fungal infections, older plants should be kept rather dry during dormancy - with the exception of several tropical species, which have to be kept slightly moist throughout the year to prevent the tuber from dessication. If dormant tubers are stored unpotted and completely dry, they are more easily infested by mealy bugs. Thus a slightly moistened soil should be maintained in all species except for African members, which prefer a dry soil during dormancy. Leaves may be infested rarely with aphis and more often with spider mites. This especially occurs in winter months and if plants are kept at rather low air humidity inside the house. Any available insecticide spray respectively systemic solution fomulated against aphids, spider mites and/or mealy bugs will work fine. Always refer to the directions of use as stated on the package. And before treating an entire collection with some new insectide, a first trial should be made on a single plant in order to check for any unwanted side-effects. Another, and much more serious pest are nematodes. These are very small and almost transparent worms with some 2mm to 4 mm in length. All dormant tubers shall be repotted every other year and inspected for these insects. An infestation can be detected for small bumby warts on the outside of the tuber. These warts will eventually implode and leave behind a small mashy crater. This wound may be the entry site for a secondary bacterial and/or fungal infection. Unfortunately there is no reliable nematocide available for an use in a private collection. If such an infestation is detected, the best thing would be to throw the entire pot (including the plant and the soil) away. For the rarer and hence pricier species, you may want to try to rescue the plant. However, an infested plant has to be kept in quarantine at all times and its pot should never get into contact with the open ground or a growing bench with other pots. Thoroughly wash the tuber removing any adherent soil. It may help to soak the tuber in some undiluted hypochlorite solution (standard bleach, wear some protective hand gloves for handling!) for some three minutes in order to remove some bacteria, fungal spores and nematodes from the tuber surface. Afterwards rinse the tuber thoroughly again with water to remove any remaining solution and let it dry a couple of days. After that repot the tuber using a new pot and fresh soil. Do not try to sterilize the old pot, but throw it away under all circumstances. Tuber offsets will inevitably be infested as well and these do not serve to regain a nematode-free stock. However, seeds, leaf bulbils and leaf cuttings are usually nematode-free , and this is the second-best option to rescue an infested plant. After successful propagation the mother plant shall be discarted as soon as possible. |
|
Plant & Seed Source An extensive list of Amorphophallus and other aroid species is available here: |
|
Note: Information on Arisaema (Cobra Lilies or Jack -in-the-Pulpit), a genus which is closely related to Amorphophallus within the aroid family (Araceae),are available on this page.
[Download this document as PDF-file:
![]() .
Adobe Acrobat Reader for viewing PDF is available for free
here.]
.
Adobe Acrobat Reader for viewing PDF is available for free
here.]
© 1999-2019
www.rareplants.eu
All rights reserved. All information given on this page is presented without any
guarantee.
IMPRINT